图形填充
🌐 Graphics Fill
如果你是图形新手,请查看图形指南。本指南深入探讨了图形的一个特定方面:如何填充它们!PixiJS 中的 fill() 方法特别强大,使你能够用颜色、纹理或渐变来填充形状。无论你是在设计游戏、UI 组件,还是创意工具,掌握 fill() 方法对于创建视觉吸引力和动态的图形都是必不可少的。本指南探讨了使用 fill() 方法实现惊人视觉效果的不同方式。
🌐 If you are new to graphics, please check out the graphics guide here. This guide dives a bit deeper into a specific aspect of graphics: how to fill them! The fill() method in PixiJS is particularly powerful, enabling you to fill shapes with colors, textures, or gradients. Whether you're designing games, UI components, or creative tools, mastering the fill() method is essential for creating visually appealing and dynamic graphics. This guide explores the different ways to use the fill() method to achieve stunning visual effects.
这里讨论的 fillStyles 也可以应用于 Text 对象!
基本颜色填充
🌐 Basic Color Fills
在创建一个 Graphics 对象时,你可以使用 fill() 方法轻松地为它填充颜色。下面是一个简单的例子:
🌐 When creating a Graphics object, you can easily fill it with a color using the fill() method. Here's a simple example:
const obj = new Graphics()
  .rect(0, 0, 200, 100) // Create a rectangle with dimensions 200x100
  .fill('red'); // Fill the rectangle with a red color

这会创建一个红色矩形。PixiJS 支持 fill() 方法的多种颜色格式。开发者可以根据自己的需求选择格式。例如,CSS 颜色字符串对用户友好且易于阅读,十六进制字符串紧凑且在设计工具中广泛使用,而数字在程序使用中效率高。数组和 Color 对象提供精确控制,非常适合高级图形处理。
🌐 This creates a red rectangle. PixiJS supports multiple color formats for the fill() method. Developers can choose a format based on their needs. For example, CSS color strings are user-friendly and readable, hexadecimal strings are compact and widely used in design tools, and numbers are efficient for programmatic use. Arrays and Color objects offer precise control, making them ideal for advanced graphics.
- CSS 颜色字符串(例如 'red', 'blue')
- 十六进制字符串(例如,'#ff0000')
- 数字(例如,
0xff0000) - 数组(例如,
[255, 0, 0]) - 用于精确颜色控制的颜色对象
示例:
🌐 Examples:
// Using a number
const obj1 = new Graphics().rect(0, 0, 100, 100).fill(0xff0000);

// Using a hex string
const obj2 = new Graphics().rect(0, 0, 100, 100).fill('#ff0000');

// Using an array
const obj3 = new Graphics().rect(0, 0, 100, 100).fill([255, 0, 0]);

// Using a Color object
const color = new Color();
const obj4 = new Graphics().rect(0, 0, 100, 100).fill(color);
使用样式对象填充
🌐 Fill with a Style Object
对于更高级的填充,你可以使用 FillStyle 对象。这允许进行额外的自定义,例如设置不透明度:
🌐 For more advanced fills, you can use a FillStyle object. This allows for additional customization, such as setting opacity:
const obj = new Graphics().rect(0, 0, 100, 100).fill({
  color: 'red',
  alpha: 0.5, // 50% opacity
});

使用纹理填充
🌐 Fill with Textures
用纹理填充形状同样简单:
🌐 Filling shapes with textures is just as simple:
const texture = await Assets.load('assets/image.png');
const obj = new Graphics().rect(0, 0, 100, 100).fill(texture);
局部与全局纹理空间
🌐 Local vs. Global Texture Space
纹理可以应用于两个坐标空间:
🌐 Textures can be applied in two coordinate spaces:
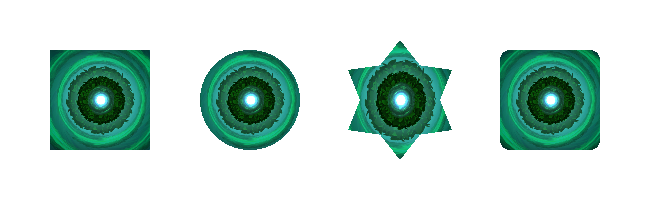
- 局部空间(默认):纹理坐标是相对于形状的尺寸和位置进行映射的。纹理坐标使用标准化坐标系统,其中 (0,0) 位于形状的左上角,(1,1) 位于形状的右下角,无论其实际像素尺寸如何。例如,如果你有一个 300x200 像素的纹理填充一个 100x100 的形状,纹理会被缩放以完全适应这 100x100 像素。纹理的左上角 (0,0) 将与形状的左上角对齐,纹理的右下角 (1,1) 将与形状的右下角对齐,根据需要拉伸或压缩纹理。
const shapes = new PIXI.Graphics()
  .rect(50, 50, 100, 100)
  .circle(250, 100, 50)
  .star(400, 100, 6, 60, 40)
  .roundRect(500, 50, 100, 100, 10)
  .fill({
    texture,
    textureSpace: 'local', // default!
  });
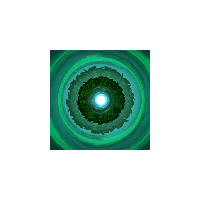
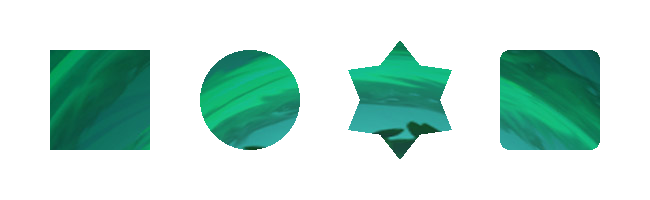
- 全局空间:将
textureSpace: 'global'设置为使纹理的位置和缩放相对于图形对象的坐标系。尽管名称为“全局”,但它并不是真正的“全局”——纹理仍然相对于图形对象固定,即使对象移动或缩放,纹理的位置也保持不变。请看下面图片如何跨越所有形状(在同一图形中):
const shapes = new PIXI.Graphics()
  .rect(50, 50, 100, 100)
  .circle(250, 100, 50)
  .star(400, 100, 6, 60, 40)
  .roundRect(500, 50, 100, 100, 10)
  .fill({
    texture,
    textureSpace: 'global',
  });
使用矩阵和纹理
🌐 Using Matrices with Textures
要修改纹理坐标,你可以应用变换矩阵,这是一种用于缩放、旋转或平移纹理的数学工具。如果你不熟悉变换矩阵,它们可以精确控制纹理的渲染方式,你可以在这里了解更多。
🌐 To modify texture coordinates, you can apply a transformation matrix, which is a mathematical tool used to scale, rotate, or translate the texture. If you're unfamiliar with transformation matrices, they allow for precise control over how textures are rendered, and you can explore more about them here.
const matrix = new Matrix().scale(0.5, 0.5);

const obj = new Graphics().rect(0, 0, 100, 100).fill({
  texture: texture,
  matrix: matrix, // scale the texture down by 2
});

纹理陷阱
🌐 Texture Gotcha's
- 精灵表:如果使用精灵表中的纹理,将使用整个源纹理。要使用特定帧,请创建一个新的纹理:
const spriteSheetTexture = Texture.from('assets/my-sprite-sheet.png');
const newTexture = renderer.generateTexture(Sprite.from(spriteSheetTexture));

const obj = new Graphics().rect(0, 0, 100, 100).fill(newTexture);
- 二次幂纹理:为了在 WebGL1 中正确平铺,纹理应为二次幂尺寸(WebGL2 和 WebGPU 无此限制)。
使用渐变填充
🌐 Fill with Gradients
PixiJS 支持线性和径向渐变,这些渐变可以使用 FillGradient 类创建。渐变对于为形状和文本增加视觉深度和动态样式特别有用。
🌐 PixiJS supports both linear and radial gradients, which can be created using the FillGradient class. Gradients are particularly useful for adding visual depth and dynamic styling to shapes and text.
线性渐变
🌐 Linear Gradients
线性渐变沿直线创建平滑的颜色过渡。这里是一个简单线性渐变的例子:
🌐 Linear gradients create a smooth color transition along a straight line. Here is an example of a simple linear gradient:
const gradient = new FillGradient({
  type: 'linear',
  colorStops: [
    { offset: 0, color: 'yellow' },
    { offset: 1, color: 'green' },
  ],
});

const obj = new Graphics().rect(0, 0, 100, 100).fill(gradient);

你可以使用以下属性控制渐变方向:
🌐 You can control the gradient direction with the following properties:
start {x, y}:这些定义了渐变的起点。例如,在线性渐变中,这就是第一个颜色停靠点的位置。这些值通常以相对坐标(0 到 1)表示,其中0代表形状的左/上边缘,1代表右/下边缘。end {x, y}:这些定义了渐变的终点。类似于start {x, y},这些值指定了最后一个颜色停止点在形状本地坐标系中的位置。
使用这些属性,你可以创建各种渐变效果,例如水平、垂直或对角过渡。例如,将 start 设置为 {x: 0, y: 0} 并将 end 设置为 {x: 1, y: 1} 将导致从形状的左上角到右下角的对角渐变。
🌐 Using these properties, you can create various gradient effects, such as horizontal, vertical, or diagonal transitions. For example, setting start to {x: 0, y: 0} and end to {x: 1, y: 1} would result in a diagonal gradient from the top-left to the bottom-right of the shape.
const diagonalGradient = new FillGradient({
  type: 'linear',
  start: { x: 0, y: 0 },
  end: { x: 1, y: 1 },
  colorStops: [
    { offset: 0, color: 'yellow' },
    { offset: 1, color: 'green' },
  ],
});

径向渐变
🌐 Radial Gradients
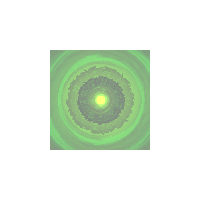
径向渐变在圆形模式中创建平滑的颜色过渡。与线性渐变不同,它们从一个圆向另一个圆混合颜色。以下是一个简单径向渐变的示例:
🌐 Radial gradients create a smooth color transition in a circular pattern. Unlike linear gradients, they blend colors from one circle to another. Here is an example of a simple radial gradient:
const gradient = new FillGradient({
  type: 'radial',
  colorStops: [
    { offset: 0, color: 'yellow' },
    { offset: 1, color: 'green' },
  ],
});

const obj = new Graphics().rect(0, 0, 100, 100).fill(gradient);

你可以使用以下属性控制渐变的形状和大小:
🌐 You can control the gradient's shape and size using the following properties:
center {x, y}:这些定义了渐变开始的内圈中心。通常,这些值以相对坐标(0 到 1)表示,其中0.5表示形状的中心。innerRadius:内圆的半径。这决定了渐变起始点的大小。outerCenter {x, y}:这些定义了渐变结束的外圆中心点。像center {x, y}一样,这些值也是相对坐标。outerRadius:外圆的半径。这决定了渐变结束点的大小。
通过调整这些属性,你可以创建多种效果,例如小而集中的渐变或大而广阔的渐变。例如,将一个小的 r0 设置为较大的 r1 将创建一个渐变,该渐变在达到内圆半径之前不会开始过渡。
🌐 By adjusting these properties, you can create a variety of effects, such as small, concentrated gradients or large, expansive ones. For example, setting a small r0 and a larger r1 will create a gradient that starts does not start to transition until the inner circle radius is reached.
const radialGradient = new FillGradient({
  type: 'radial',
  center: { x: 0.5, y: 0.5 },
  innerRadius: 0.25,
  outerCenter: { x: 0.5, y: 0.5 },
  outerRadius: 0.5,
  colorStops: [
    { offset: 0, color: 'blue' },
    { offset: 1, color: 'red' },
  ],
});

const obj = new Graphics().rect(0, 0, 100, 100).fill(gradient);

渐变陷阱
🌐 Gradient Gotcha's
- 内存管理:当不再需要梯度时,使用
fillGradient.destroy()释放资源。 - 动画:更新现有渐变而不是创建新的渐变,以获得更好的性能。
- 自定义着色器:对于复杂动画,自定义着色器可能更高效。
- 纹理和矩阵的限制:在内部,渐变填充会同时设置纹理和矩阵属性。这意味着你无法在使用渐变填充的同时使用纹理填充或矩阵变换。
结合纹理和颜色
🌐 Combining Textures and Colors
你可以将纹理或渐变与颜色色调和透明度结合起来,以实现更复杂和视觉上更有吸引力的效果。这允许你在纹理或渐变上叠加颜色,并通过透明度值调整其透明度。
🌐 You can combine a texture or gradients with a color tint and alpha to achieve more complex and visually appealing effects. This allows you to overlay a color on top of the texture or gradient, adjusting its transparency with the alpha value.
const gradient = new FillGradient({
  colorStops: [
    { offset: 0, color: 'blue' },
    { offset: 1, color: 'red' },
  ],
});

const obj = new Graphics().rect(0, 0, 100, 100).fill({
  fill: gradient,
  color: 'yellow',
  alpha: 0.5,
});

const obj = new Graphics().rect(0, 0, 100, 100).fill({
  texture: texture,
  color: 'yellow',
  alpha: 0.5,
});
希望本指南已经向你展示了在处理图形(和文本!)时,填充是多么简单而强大。通过掌握 fill() 方法,你可以在 PixiJS 中开启无限可能,创造视觉上动态且引人入胜的图形。玩得开心!
🌐 Hopefully, this guide has shown you how easy and powerful fills can be when working with graphics (and text!). By mastering the fill() method, you can unlock endless possibilities for creating visually dynamic and engaging graphics in PixiJS. Have fun!